Designing an External API Platform
Introduction
At NearMe, we recently built an external API platform for our ridesharing service. This makes it possible to place orders seamlessly from other applications and to build custom UIs for new channels such as LINE mini apps. Designing the platform required a range of considerations, so I would like to summarize them here.
How We Provide It
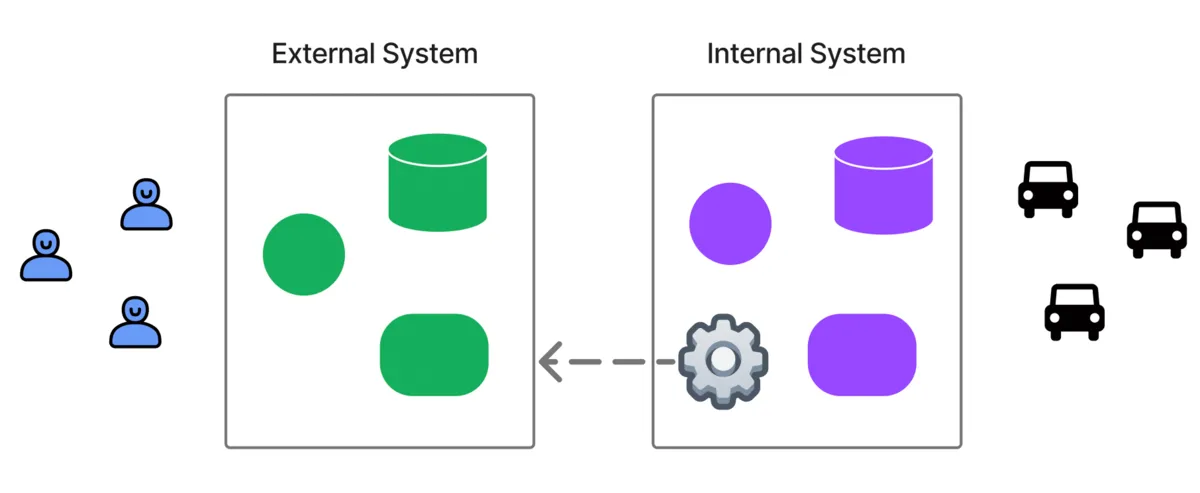
To use the API, we first create an external partner “organization,” and then create “services” under that organization, such as “XX Area Shuttle” or “XX School Transfer.” This allows the partner to use user management, vehicle management, order management, and other features from the admin console. Because the system is multi-tenant, a dedicated service is created for each case.
Next, we create an “application” entry that stores the basic information required for the API integration. This is also where we configure credentials, the webhook URL, and similar settings. The ID of this “application” acts as a key, making it possible to tell, for example, that a given order was created through a particular external integration.
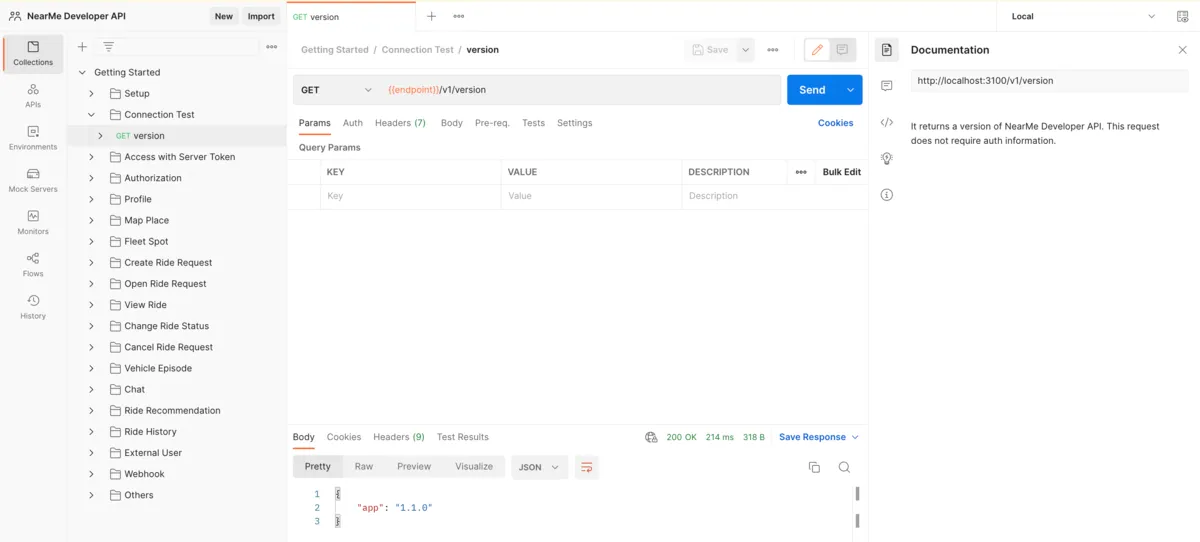
Finally, we test the API. We use Jupyter Notebook so that the main APIs can be called immediately, and we also use Postman to organize the API set comprehensively. Some of Postman’s strengths are that it can store variables and switch them by environment, run scripts before and after API execution to manipulate variables, attach documentation to each API, save and display responses, and present the API list in a clear, readable way. The following figure shows an actual example of how we use Postman.
Authentication
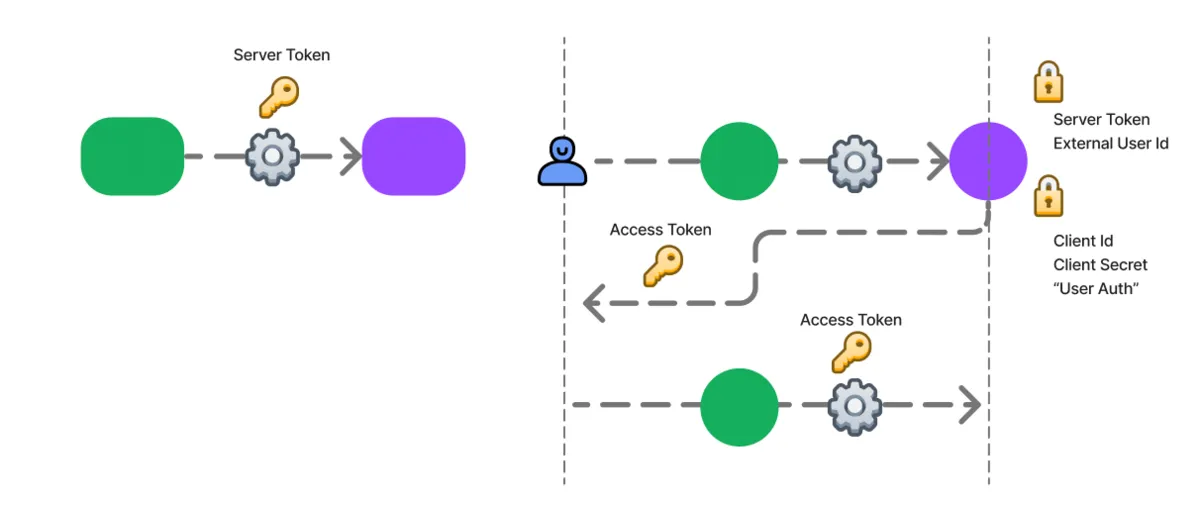
Authentication for accessing resources is divided into authentication for the “organization” and authentication for each user.
For the organization-level side, we use a server_token.
Requests are sent from a trusted server with this token attached in the request header.
For individual users, requests are made with an access_token attached in the request header. When linking external users, we first use the server_token to create a NearMe user associated with the “application,” and then use the server_token again to obtain that user’s access_token. Otherwise, we follow an OAuth-style flow using client_id and client_secret. Along with the user credentials appropriate to the permission type, the client_id and client_secret issued through a trusted server are sent to the login API to obtain an access_token (reference; note that the password grant type is used only for testing).
Webhook
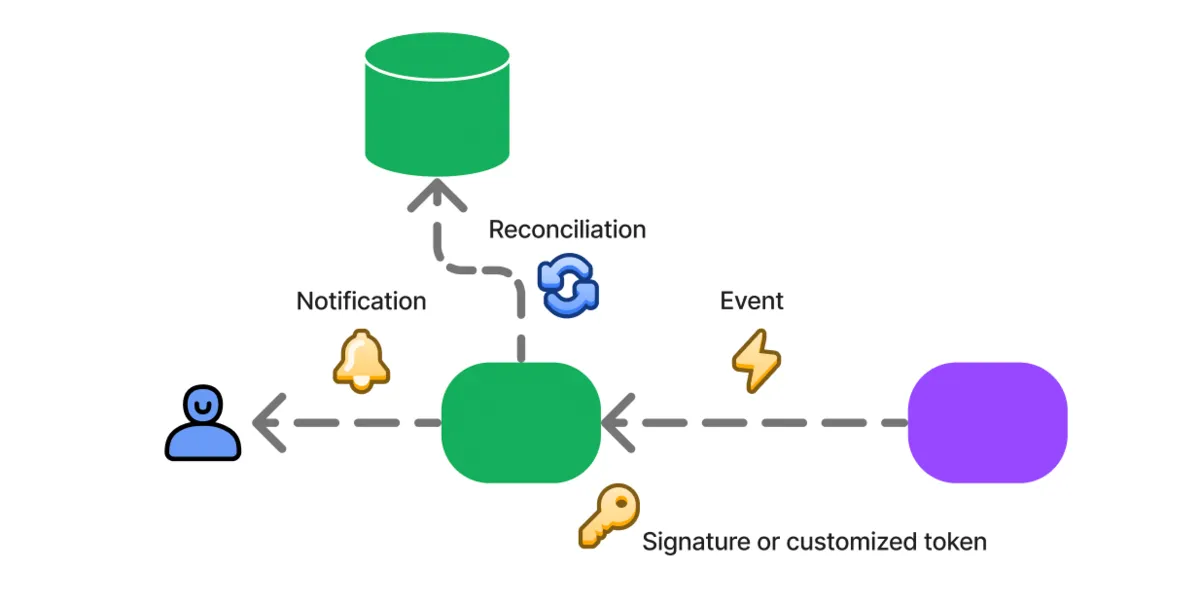
We use webhooks to integrate notifications and synchronize state across systems. For example, an event such as “operation completed” is sent from NearMe’s system to an external system. NearMe’s system cannot send push notifications directly to users in an external system, so we use this webhook mechanism to let the external system deliver those notifications.
The webhook URL and authentication information are also stored in the “application.”
Because webhook authentication depends on the external system, we made this part flexible.
At the same time, by default we also support verifying the sender by using a signature generated from the SHA256 hash of the request body with client_secret as the key (reference).
Relay Service
We already had internal APIs in place, so in theory we could have exposed them directly after adjusting permissions. However, external APIs need to prioritize stability and clarity more strongly, so we introduced a new relay service to sit between clients and the internal APIs and absorb those differences.
GraphQL or REST API?
In particular, although the internal APIs were built with GraphQL, we chose to build the external APIs as REST APIs.
GraphQL has several advantages. Its strict typing makes mistakes easier to notice, and its flexibility allows data to be fetched efficiently. On the other hand, even small schema changes can cause errors, and it is not always obvious what query should be written. There is also some learning cost in becoming familiar with GraphQL itself.
REST APIs, by contrast, usually keep returning responses even when small schema changes occur, and it is clearer which API to call and how to call it. The downside is that schema changes can more easily slip through as unnoticed errors, and clients may end up fetching unnecessary data or making repeated API calls.
When developing internally, GraphQL’s drawbacks are not such a major problem. But when external users consume the API, I believe GraphQL’s drawbacks outweigh those of REST.
Renaming Fields
Because the external API is built as REST, the relay server needs to convert from GraphQL to REST. That also gave us an opportunity to refactor names, which turned out to be beneficial.
Once an external API is published, changing it becomes difficult, so we want to choose names as carefully as possible. That is also true for internal APIs, but there is usually still a better chance to revise them later. Sometimes you have to make a pragmatic choice, and in other cases a better name only becomes clear after development has progressed.
For example, field values such as dispatch status were managed as numbers in the internal API, but we converted them into easy-to-understand strings for the external API. Using numbers has some advantages in terms of saving data, and it also makes development easier because you do not have to think too deeply about naming at that stage. The symbolic names are handled in code and can be changed later. For external users, however, that would create unnecessary inconvenience.

Closing Thoughts
I have described both the basic way we build NearMe’s external API platform and the relay service that reflects its design philosophy. When building it, we referred to many examples from other services. I hope this article can also serve as a useful reference.
Finally, NearMe is hiring engineers. If you are interested, please take a look below.
Author: Kenji Hosoda